#Installing postgres app
Explore tagged Tumblr posts
Visit Tumblr Blog
Explore Tumblr blogs with no restrictions, modern design and the best experience.
Last Seen Tumblr Blogs


Fun Fact
Tumblr has a low social media market share in South America.
Text
Is ChatGPT Easy to Use? Here’s What You Need to Know
Introduction: A Curious Beginning I still remember the first time I stumbled upon ChatGPT my heart raced at the thought of talking to an AI. I was a fresh-faced IT enthusiast, eager to explore how a “gpt chat” interface could transform my workflow. Yet, as excited as I was, I also felt a tinge of apprehension: Would I need to learn a new programming language? Would I have to navigate countless settings? Spoiler alert: Not at all. In this article, I’m going to walk you through my journey and show you why ChatGPT is as straightforward as chatting with a friend. By the end, you’ll know exactly “how to use ChatGPT” in your day-to-day IT endeavors whether you’re exploring the “chatgpt app” on your phone or logging into “ChatGPT online” from your laptop.
What Is ChatGPT, Anyway?
If you’ve heard of “chat openai,” “chat gbt ai,” or “chatgpt openai,” you already know that OpenAI built this tool to mimic human-like conversation. ChatGPT sometimes written as “Chat gpt”—is an AI-powered chatbot that understands natural language and responds with surprisingly coherent answers. With each new release remember buzz around “chatgpt 4”? OpenAI has refined its approach, making the bot smarter at understanding context, coding queries, creative brainstorming, and more.
GPT Chat: A shorthand term some people use, but it really means the same as ChatGPT just another way to search or tag the service.
ChatGPT Online vs. App: Although many refer to “chatgpt online,” you can also download the “chatgpt app” on iOS or Android for on-the-go access.
Free vs. Paid: There’s even a “chatgpt gratis” option for users who want to try without commitment, while premium plans unlock advanced features.
Getting Started: Signing Up for ChatGPT Online
1. Creating Your Account
First things first head over to the ChatGPT website. You’ll see a prompt to sign up or log in. If you’re wondering about “chat gpt free,” you’re in luck: OpenAI offers a free tier that anyone can access (though it has usage limits). Here’s how I did it:
Enter your email (or use Google/Microsoft single sign-on).
Verify your email with the link they send usually within seconds.
Log in, and voila, you’re in!
No complex setup, no plugin installations just a quick email verification and you’re ready to talk to your new AI buddy. Once you’re “ChatGPT online,” you’ll land on a simple chat window: type a question, press Enter, and watch GPT 4 respond.
Navigating the ChatGPT App
While “ChatGPT online” is perfect for desktop browsing, I quickly discovered the “chatgpt app” on my phone. Here’s what stood out:
Intuitive Interface: A text box at the bottom, a menu for adjusting settings, and conversation history links on the side.
Voice Input: On some versions, you can tap the microphone icon—no need to type every query.
Seamless Sync: Whatever you do on mobile shows up in your chat history on desktop.
For example, one night I was troubleshooting a server config while waiting for a train. Instead of squinting at the station’s Wi-Fi, I opened the “chat gpt free” app on my phone, asked how to tweak a Dockerfile, and got a working snippet in seconds. That moment convinced me: whether you’re using “chatgpt online” or the “chatgpt app,” the learning curve is minimal.
Key Features of ChatGPT 4
You might have seen “chatgpt 4” trending this iteration boasts numerous improvements over earlier versions. Here’s why it feels so effortless to use:
Better Context Understanding: Unlike older “gpt chat” bots, ChatGPT 4 remembers what you asked earlier in the same session. If you say, “Explain SQL joins,” and then ask, “How does that apply to Postgres?”, it knows you’re still talking about joins.
Multi-Turn Conversations: Complex troubleshooting often requires back-and-forth questions. I once spent 20 minutes configuring a Kubernetes cluster entirely through a multi-turn conversation.
Code Snippet Generation: Want Ruby on Rails boilerplate or a Python function? ChatGPT 4 can generate working code that requires only minor tweaks. Even if you make a mistake, simply pasting your error output back into the chat usually gets you an explanation.
These features mean that even non-developers say, a project manager looking to automate simple Excel tasks can learn “how to use ChatGPT” with just a few chats. And if you’re curious about “chat gbt ai” in data analytics, hop on and ask ChatGPT can translate your plain-English requests into practical scripts.
Tips for First-Time Users
I’ve coached colleagues on “how to use ChatGPT” in the last year, and these small tips always come in handy:
Be Specific: Instead of “Write a Python script,” try “Write a Python 3.9 script that reads a CSV file and prints row sums.” The more detail, the more precise the answer.
Ask Follow-Up Questions: Stuck on part of the response? Simply type, “Can you explain line 3 in more detail?” This keeps the flow natural—just like talking to a friend.
Use System Prompts: At the very start, you can say, “You are an IT mentor. Explain in beginner terms.” That “meta” instruction shapes the tone of every response.
Save Your Favorite Replies: If you stumble on a gem—say, a shell command sequence—star it or copy it to a personal notes file so you can reference it later.
When a coworker asked me how to connect a React frontend to a Flask API, I typed exactly that into the chat. Within seconds, I had boilerplate code, NPM install commands, and even a short security note: “Don’t forget to add CORS headers.” That level of assistance took just three minutes, demonstrating why “gpt chat” can feel like having a personal assistant.
Common Challenges and How to Overcome Them
No tool is perfect, and ChatGPT is no exception. Here are a few hiccups you might face and how to fix them:
Occasional Inaccuracies: Sometimes, ChatGPT can confidently state something that’s outdated or just plain wrong. My trick? Cross-check any critical output. If it’s a code snippet, run it; if it’s a conceptual explanation, ask follow-up questions like, “Is this still true for Python 3.11?”
Token Limits: On the “chatgpt gratis” tier, you might hit usage caps or get slower response times. If you encounter this, try simplifying your prompt or wait a few minutes for your quota to reset. If you need more, consider upgrading to a paid plan.
Overly Verbose Answers: ChatGPT sometimes loves to explain every little detail. If that happens, just say, “Can you give me a concise version?” and it will trim down its response.
Over time, you learn how to phrase questions so that ChatGPT delivers exactly what you need quickly—no fluff, just the essentials. Think of it as learning the “secret handshake” to get premium insights from your digital buddy.
Comparing Free and Premium Options
If you search “chat gpt free” or “chatgpt gratis,” you’ll see that OpenAI’s free plan offers basic access to ChatGPT 3.5. It’s great for light users students looking for homework help, writers brainstorming ideas, or aspiring IT pros tinkering with small scripts. Here’s a quick breakdown: FeatureFree Tier (ChatGPT 3.5)Paid Tier (ChatGPT 4)Response SpeedStandardFaster (priority access)Daily Usage LimitsLowerHigherAccess to Latest ModelChatGPT 3.5ChatGPT 4 (and beyond)Advanced Features (e.g., Code)LimitedFull accessChat History StorageShorter retentionLonger session memory
For someone just dipping toes into “chat openai,” the free tier is perfect. But if you’re an IT professional juggling multiple tasks and you want the speed and accuracy of “chatgpt 4” the upgrade is usually worth it. I switched to a paid plan within two weeks of experimenting because my productivity jumped tenfold.
Real-World Use Cases for IT Careers
As an IT blogger, I’ve seen ChatGPT bridge gaps in various IT roles. Here are some examples that might resonate with you:
Software Development: Generating boilerplate code, debugging error messages, or even explaining complex algorithms in simple terms. When I first learned Docker, ChatGPT walked me through building an image, step by step.
System Administration: Writing shell scripts, explaining how to configure servers, or outlining best security practices. One colleague used ChatGPT to set up an Nginx reverse proxy without fumbling through documentation.
Data Analysis: Crafting SQL queries, parsing data using Python pandas, or suggesting visualization libraries. I once asked, “How to use chatgpt for data cleaning?” and got a concise pandas script that saved hours of work.
Project Management: Drafting Jira tickets, summarizing technical requirements, or even generating risk-assessment templates. If you ever struggled to translate technical jargon into plain English for stakeholders, ChatGPT can be your translator.
In every scenario, I’ve found that the real magic isn’t just the AI’s knowledge, but how quickly it can prototype solutions. Instead of spending hours googling or sifting through Stack Overflow, you can ask a direct question and get an actionable answer in seconds.
Security and Privacy Considerations
Of course, when dealing with AI, it’s wise to think about security. Here’s what you need to know:
Data Retention: OpenAI may retain conversation data to improve their models. Don’t paste sensitive tokens, passwords, or proprietary code you can’t risk sharing.
Internal Policies: If you work for a company with strict data guidelines, check whether sending internal data to a third-party service complies with your policy.
Public Availability: Remember that anyone else could ask ChatGPT similar questions. If you need unique, private solutions, consult official documentation or consider an on-premises AI solution.
I routinely use ChatGPT for brainstorming and general code snippets, but for production credentials or internal proprietary logic, I keep those aspects offline. That balance lets me benefit from “chatgpt openai” guidance without compromising security.
Is ChatGPT Right for You?
At this point, you might be wondering, “Okay, but is it really easy enough for me?” Here’s my honest take:
Beginners who have never written a line of code can still ask ChatGPT to explain basic IT concepts no jargon needed.
Intermediate users can leverage the “chatgpt app” on mobile to troubleshoot on the go, turning commute time into learning time.
Advanced professionals will appreciate how ChatGPT 4 handles multi-step instructions and complex code logic.
If you’re seriously exploring a career in IT, learning “how to use ChatGPT” is almost like learning to use Google in 2005: essential. Sure, there’s a short learning curve to phrasing your prompts for maximum efficiency, but once you get the hang of it, it becomes second nature just like typing “ls -la” into a terminal.
Conclusion: Your Next Steps
So, is ChatGPT easy to use? Absolutely. Between the intuitive “chatgpt app,” the streamlined “chatgpt online” interface, and the powerful capabilities of “chatgpt 4,” most users find themselves up and running within minutes. If you haven’t already, head over to the ChatGPT website and create your free account. Experiment with a few prompts maybe ask it to explain “how to use chatgpt” and see how it fits into your daily routine.
Remember:
Start simple. Ask basic questions, then gradually dive deeper.
Don’t be afraid to iterate. If an answer isn’t quite right, refine your prompt.
Keep security in mind. Never share passwords or sensitive data.
Whether you’re writing your first “gpt chat” script, drafting project documentation, or just curious how “chat gbt ai” can spice up your presentations, ChatGPT is here to help. Give it a try, and in no time, you’ll wonder how you ever managed without your AI sidekick.
1 note
·
View note
Link
0 notes
Text
Using Docker for Full Stack Development and Deployment

1. Introduction to Docker
What is Docker? Docker is an open-source platform that automates the deployment, scaling, and management of applications inside containers. A container packages your application and its dependencies, ensuring it runs consistently across different computing environments.
Containers vs Virtual Machines (VMs)
Containers are lightweight and use fewer resources than VMs because they share the host operating system’s kernel, while VMs simulate an entire operating system. Containers are more efficient and easier to deploy.
Docker containers provide faster startup times, less overhead, and portability across development, staging, and production environments.
Benefits of Docker in Full Stack Development
Portability: Docker ensures that your application runs the same way regardless of the environment (dev, test, or production).
Consistency: Developers can share Dockerfiles to create identical environments for different developers.
Scalability: Docker containers can be quickly replicated, allowing your application to scale horizontally without a lot of overhead.
Isolation: Docker containers provide isolated environments for each part of your application, ensuring that dependencies don’t conflict.
2. Setting Up Docker for Full Stack Applications
Installing Docker and Docker Compose
Docker can be installed on any system (Windows, macOS, Linux). Provide steps for installing Docker and Docker Compose (which simplifies multi-container management).
Commands:
docker --version to check the installed Docker version.
docker-compose --version to check the Docker Compose version.
Setting Up Project Structure
Organize your project into different directories (e.g., /frontend, /backend, /db).
Each service will have its own Dockerfile and configuration file for Docker Compose.
3. Creating Dockerfiles for Frontend and Backend
Dockerfile for the Frontend:
For a React/Angular app:
Dockerfile
FROM node:14 WORKDIR /app COPY package*.json ./ RUN npm install COPY . . EXPOSE 3000 CMD ["npm", "start"]
This Dockerfile installs Node.js dependencies, copies the application, exposes the appropriate port, and starts the server.
Dockerfile for the Backend:
For a Python Flask app
Dockerfile
FROM python:3.9 WORKDIR /app COPY requirements.txt . RUN pip install -r requirements.txt COPY . . EXPOSE 5000 CMD ["python", "app.py"]
For a Java Spring Boot app:
Dockerfile
FROM openjdk:11 WORKDIR /app COPY target/my-app.jar my-app.jar EXPOSE 8080 CMD ["java", "-jar", "my-app.jar"]
This Dockerfile installs the necessary dependencies, copies the code, exposes the necessary port, and runs the app.
4. Docker Compose for Multi-Container Applications
What is Docker Compose? Docker Compose is a tool for defining and running multi-container Docker applications. With a docker-compose.yml file, you can configure services, networks, and volumes.
docker-compose.yml Example:
yaml
version: "3" services: frontend: build: context: ./frontend ports: - "3000:3000" backend: build: context: ./backend ports: - "5000:5000" depends_on: - db db: image: postgres environment: POSTGRES_USER: user POSTGRES_PASSWORD: password POSTGRES_DB: mydb
This YAML file defines three services: frontend, backend, and a PostgreSQL database. It also sets up networking and environment variables.
5. Building and Running Docker Containers
Building Docker Images:
Use docker build -t <image_name> <path> to build images.
For example:
bash
docker build -t frontend ./frontend docker build -t backend ./backend
Running Containers:
You can run individual containers using docker run or use Docker Compose to start all services:
bash
docker-compose up
Use docker ps to list running containers, and docker logs <container_id> to check logs.
Stopping and Removing Containers:
Use docker stop <container_id> and docker rm <container_id> to stop and remove containers.
With Docker Compose: docker-compose down to stop and remove all services.
6. Dockerizing Databases
Running Databases in Docker:
You can easily run databases like PostgreSQL, MySQL, or MongoDB as Docker containers.
Example for PostgreSQL in docker-compose.yml:
yaml
db: image: postgres environment: POSTGRES_USER: user POSTGRES_PASSWORD: password POSTGRES_DB: mydb
Persistent Storage with Docker Volumes:
Use Docker volumes to persist database data even when containers are stopped or removed:
yaml
volumes: - db_data:/var/lib/postgresql/data
Define the volume at the bottom of the file:
yaml
volumes: db_data:
Connecting Backend to Databases:
Your backend services can access databases via Docker networking. In the backend service, refer to the database by its service name (e.g., db).
7. Continuous Integration and Deployment (CI/CD) with Docker
Setting Up a CI/CD Pipeline:
Use Docker in CI/CD pipelines to ensure consistency across environments.
Example: GitHub Actions or Jenkins pipeline using Docker to build and push images.
Example .github/workflows/docker.yml:
yaml
name: CI/CD Pipeline on: [push] jobs: build: runs-on: ubuntu-latest steps: - name: Checkout Code uses: actions/checkout@v2 - name: Build Docker Image run: docker build -t myapp . - name: Push Docker Image run: docker push myapp
Automating Deployment:
Once images are built and pushed to a Docker registry (e.g., Docker Hub, Amazon ECR), they can be pulled into your production or staging environment.
8. Scaling Applications with Docker
Docker Swarm for Orchestration:
Docker Swarm is a native clustering and orchestration tool for Docker. You can scale your services by specifying the number of replicas.
Example:
bash
docker service scale myapp=5
Kubernetes for Advanced Orchestration:
Kubernetes (K8s) is more complex but offers greater scalability and fault tolerance. It can manage Docker containers at scale.
Load Balancing and Service Discovery:
Use Docker Swarm or Kubernetes to automatically load balance traffic to different container replicas.
9. Best Practices
Optimizing Docker Images:
Use smaller base images (e.g., alpine images) to reduce image size.
Use multi-stage builds to avoid unnecessary dependencies in the final image.
Environment Variables and Secrets Management:
Store sensitive data like API keys or database credentials in Docker secrets or environment variables rather than hardcoding them.
Logging and Monitoring:
Use tools like Docker’s built-in logging drivers, or integrate with ELK stack (Elasticsearch, Logstash, Kibana) for advanced logging.
For monitoring, tools like Prometheus and Grafana can be used to track Docker container metrics.
10. Conclusion
Why Use Docker in Full Stack Development? Docker simplifies the management of complex full-stack applications by ensuring consistent environments across all stages of development. It also offers significant performance benefits and scalability options.
Recommendations:
Encourage users to integrate Docker with CI/CD pipelines for automated builds and deployment.
Mention the use of Docker for microservices architecture, enabling easy scaling and management of individual services.
WEBSITE: https://www.ficusoft.in/full-stack-developer-course-in-chennai/
0 notes
Text
Let's do Fly and Bun🚀
0. Sample Bun App
1. Install flycll
$ brew install flyctl
$ fly version fly v0.1.56 darwin/amd64 Commit: 7981f99ff550f66def5bbd9374db3d413310954f-dirty BuildDate: 2023-07-12T20:27:19Z
$ fly help Deploying apps and machines: apps Manage apps machine Commands that manage machines launch Create and configure a new app from source code or a Docker image. deploy Deploy Fly applications destroy Permanently destroys an app open Open browser to current deployed application Scaling and configuring: scale Scale app resources regions V1 APPS ONLY: Manage regions secrets Manage application secrets with the set and unset commands. Provisioning storage: volumes Volume management commands mysql Provision and manage PlanetScale MySQL databases postgres Manage Postgres clusters. redis Launch and manage Redis databases managed by Upstash.com consul Enable and manage Consul clusters Networking configuration: ips Manage IP addresses for apps wireguard Commands that manage WireGuard peer connections proxy Proxies connections to a fly VM certs Manage certificates Monitoring and managing things: logs View app logs status Show app status dashboard Open web browser on Fly Web UI for this app dig Make DNS requests against Fly.io's internal DNS server ping Test connectivity with ICMP ping messages ssh Use SSH to login to or run commands on VMs sftp Get or put files from a remote VM. Platform overview: platform Fly platform information Access control: orgs Commands for managing Fly organizations auth Manage authentication move Move an app to another organization More help: docs View Fly documentation doctor The DOCTOR command allows you to debug your Fly environment help commands A complete list of commands (there are a bunch more)
2. Sign up
$ fly auth signup
or
$ fly auth login
3. Launch App
Creating app in /Users/yanagiharas/works/bun/bun-getting-started/quickstart Scanning source code Detected a Bun app ? Choose an app name (leave blank to generate one): hello-bun
4. Dashboard
0 notes
Text
The data directory contains an old postmaster.pid file
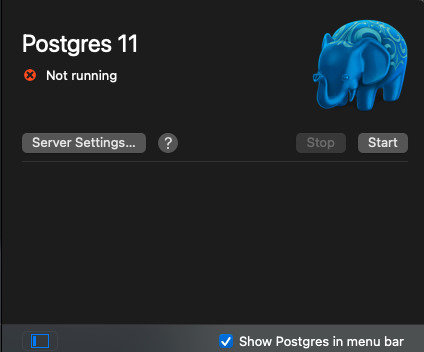
PostgreSQL Connection Failure
I experienced this issue when my laptop crushed and after rebooting, PostgreSQL was unable to connect to the database. I attempted to start my server and this error dialog window appeared.
The Problem: Two instances of the same PostgreSQL server cannot run on the same data directory at the same time thanks to the postmaster.pid lock file. Follow the link for more information about what a postmaster.pid file is, otherwise let's move on to resolving our issues.

STEP 1:
Click on the “OK” button to close the dialog window or open the Postgres.app desktop app if its not already open

STEP 2
Click on “Server Settings…” button
Click on Show button next to the Data Directory. This should open the data directory of your PostgreSQl installation.

STEP 3
Once you have located your postmaster.pid file. Delete it!

STEP 4
After deleting the file, the error message should change from "Stale postmaster.pid file" to "Not running" on the Postgres GUI app . Now just start your PostgreSQL server by clicking the "Start" button on the Postgres GUI app
Finally

0 notes
Text
figured out postgres. is this how God feels?
0 notes
Text
Installing postgres app

#Installing postgres app how to#
#Installing postgres app install#
#Installing postgres app download#
#Installing postgres app mac#
#Installing postgres app how to#
See Removing Existing PostgreSQL Installations on the Postgres.app website for instructions on how to do this. It’s recommended that you remove any pre-existing PostgreSQL installations before installing Postgres.app. If you do, you’ll run into problems, if both versions are trying to use the same port (5432 is the default port). The above instructions assume you don’t already have PostgreSQL running on your Mac. sudo mkdir -p /etc/paths.d &Įcho /Applications/Postgres.app/Contents/Versions/latest/bin | sudo tee /etc/paths.d/postgresapp Remove Existing Installations You can also configure your $PATH to use the included command line tools. This will connect to your default database.Īnother alternative is to use a GUI application, such as pgAdmin, DBeaver, Postico, Azure Data Studio, etc. This will connect to that database using the psql command line interface.Īlternatively, you can launch psql in a separate terminal window and type psql. To connect to a database, double click one of the database icons shown in the above screen. You can start and stop PostgreSQL using the relevant buttons on this panel.
#Installing postgres app install#
When you install Postgres.app, several databases are created by default, including one using your system username. Once you’ve done that, you should see a screen similar to the following:
Double-click the Postgres.app icon (in your Applications folder).
Drag the Postgres.app icon to your Applications folder.ĭone.
#Installing postgres app download#
Download the latest version of Postgres.app from the Postgres.app website.
Here are step-by-step instructions for installing PostgreSQL.app on your Mac. You simply download it and drag it to your Applications folder, just like with any other application.
#Installing postgres app mac#
Postgres.app is a full-featured PostgreSQL installation packaged as a standard Mac application. While you can configure PATH for this to work, there is easier solution.The easiest way to install PostgreSQL on a Mac is by installing Postgres.app. Because this package for the setup expects to find standard Postgres installation on your machine. However this won't work on your local machine. If you already deployed your app on the server with Postgres, you probably installed the psycopg2 package to talk to the database. Click the "Start" button and your server is ready to go. Now all that is left to do is to run the app. Download it, open and move the Postgres.app to Applications folder on your Mac. The most up to date version is "Postgres.app with PostgreSQL 13" as of writing this post in December 2020. You can get the dmg file from the official site. This also assumes you don't have other versions of Postgres installed. There are more than one ways how to install this database on your machine, however downloading Postgres.app is the easiest. We will start with the Postgres part that is not Django specific. So developing this feature without Postgres database would be kind of crazy.Īnyway, let's see how to setup Postgres locally. Add -set flags to the command to connect the installation to the PVC you created and enable volume permissions: helm install release-name repo-name -set persistence.existingClaim pvc-name -set volumePermissions.enabledtrue. Postgres offers powerful full-text search you can use from Django. Install the helm chart with the helm install command. In my case, what kind of forced me to have local PostgreSQL for one of my projects, was search. For example SQLite does not care about length of the text in columns. You can get yourself into a situation where your app works locally but does not start on the server, because there is a small difference in how these two databases work. While this setup is pretty easy (you get configuration for SQLite out of the box) it has some issues. With Django I would say it is pretty common to have SQLite as a developer database and then on the server have Postgres as "the real" production database.
0 notes
Text
Installing postgres app

#INSTALLING POSTGRES APP HOW TO#
#INSTALLING POSTGRES APP INSTALL#
#INSTALLING POSTGRES APP UPDATE#
#INSTALLING POSTGRES APP CODE#
#INSTALLING POSTGRES APP PASSWORD#
Now, we can give our new user access to administer our new database:
ALTER ROLE myprojectuser SET timezone TO 'UTC'.
ALTER ROLE myprojectuser SET default_transaction_isolation TO 'read committed'.
ALTER ROLE myprojectuser SET client_encoding TO 'utf8'.
These are all recommendations from the Django project itself: By default, our Django projects will be set to use UTC. We are also setting the default transaction isolation scheme to “read committed”, which blocks reads from uncommitted transactions. We are setting the default encoding to UTF-8, which Django expects. This will speed up database operations so that the correct values do not have to be queried and set each time a connection is established.
#INSTALLING POSTGRES APP PASSWORD#
CREATE USER myprojectuser WITH PASSWORD ' password' Īfterwards, we’ll modify a few of the connection parameters for the user we just created.
Next, create a database user for our project. Note: Every Postgres statement must end with a semi-colon, so make sure that your command ends with one if you are experiencing issues. You will be given a PostgreSQL prompt where we can set up our requirements.įirst, create a database for your project: Log into an interactive Postgres session by typing: We can use sudo and pass in the username with the -u option. We need to use this user to perform administrative tasks. Basically, this means that if the user’s operating system username matches a valid Postgres username, that user can login with no further authentication.ĭuring the Postgres installation, an operating system user named postgres was created to correspond to the postgres PostgreSQL administrative user. We’re going to jump right in and create a database and database user for our Django application.īy default, Postgres uses an authentication scheme called “peer authentication” for local connections. Creating the PostgreSQL Database and User
#INSTALLING POSTGRES APP INSTALL#
This will install pip, the Python development files needed to build Gunicorn later, the Postgres database system and the libraries needed to interact with it, and the Nginx web server.
sudo apt install python-pip python-dev libpq-dev postgresql postgresql-contrib nginx curl.
If you are starting new projects, it is strongly recommended that you choose Python 3.
sudo apt install python3-pip python3-dev libpq-dev postgresql postgresql-contrib nginx curlĭjango 1.11 is the last release of Django that will support Python 2.
If you are using Django with Python 3, type: The packages we install depend on which version of Python your project will use.
#INSTALLING POSTGRES APP UPDATE#
We need to update the local apt package index and then download and install the packages. We will use the Python package manager pip to install additional components a bit later. To begin the process, we’ll download and install all of the items we need from the Ubuntu repositories. Installing the Packages from the Ubuntu Repositories We will then set up Nginx in front of Gunicorn to take advantage of its high performance connection handling mechanisms and its easy-to-implement security features. This will serve as an interface to our application, translating client requests from HTTP to Python calls that our application can process. Once we have our database and application up and running, we will install and configure the Gunicorn application server. Installing Django into an environment specific to your project will allow your projects and their requirements to be handled separately. We will be installing Django within a virtual environment.
#INSTALLING POSTGRES APP HOW TO#
You can learn how to set this up by running through our initial server setup guide. In order to complete this guide, you should have a fresh Ubuntu 20.04 server instance with a basic firewall and a non-root user with sudo privileges configured. We will then set up Nginx to reverse proxy to Gunicorn, giving us access to its security and performance features to serve our apps. We will configure the Gunicorn application server to interface with our applications. We will be setting up a PostgreSQL database instead of using the default SQLite database. In this guide, we will demonstrate how to install and configure some components on Ubuntu 20.04 to support and serve Django applications.
#INSTALLING POSTGRES APP CODE#
Django includes a simplified development server for testing your code locally, but for anything even slightly production related, a more secure and powerful web server is required. Introductionĭjango is a powerful web framework that can help you get your Python application or website off the ground. A previous version of this article was written by Justin Ellingwood.
0 notes
Text
Apple M1 para desenvolvedores do zero - Part 1
Eae, essa vai ser uma série ( espero ) de artigos de tudo que fiz assim que recebi o meu Macbook Air com processador M1. Espero que te ajude migrar todo seu ambiente Intel para M1 ( arm64 ).
Infelizmente ainda temos um caminho longo pela frente, boa parte dos softwares já conseguem ser compilados nativamente, porem, outros ainda precisam ser emulados atrav'ées do Rosetta por conta de bibliotecas de sistema com "ffi" que ainda não estao 100% compativels.
Separei em topicos de passos que segui exatamente na ordem que estão, espero que ajude.
Xcode + Rosetta
A instalação é feita através da App Store. Antes de começar toda a configuração da maquina instale a versão mais recente.
Em seguida instalar componentes de desenvolvimento: xcode-select --install
Brew no M1 ( Gerenciador de Pacotes )
As instalação do brew eu segui as instruções dadas a partir do artigo:
https://gist.github.com/nrubin29/bea5aa83e8dfa91370fe83b62dad6dfa
Instalando dependências de sistema
Essas bibliotecas servirão para diversos softwares como Python, Pillow, Node e etc. Elas são necessárias para a compilação e uso dos mesmos.
brew install libtiff libjpeg webp little-cms2 freetype harfbuzz fribidi brew install openblas brew install blis brew install zlib brew install gdal brew install pyenv brew install geoip brew install libgeoip brew install libffi brew install xz
Opcionais:
brew install postgres
Instalando Pyenv no M1
Instalando pyenv para facilitar o isolavento e definição de versões do python no sistema.
Eu tive problemas instalando diretamente no sistema, utilizando o brew. Algumas bibliotecas não eram encontradas e o trabalho para configuração de PATHs me fez migrar para pyenv.
brew install pyenv
Variaveis de ambiente
Para que as futuras compilações e instalações consigam encontrar todas as bibliotecas instaladas através do brew, é necessário configurar variáveis de ambiente para isso.
Adicione as linhas abaixo em seu arquivo de configuração do shell.
Se for bash: .bashrc Se for zsh: .zshrc
Eu fiz um script onde faz cache das chamadas do homebrew. Fique atento as versões das bibliotecas, se por ventura algumas delas não forem encontradas, confira o path das variaveis de ambiente.
Obs.: A melhor forma para obter o path das bibliotecas seria através do comando brew --prefix mas fazer inumeras chamadas pode deixar a inicialização do shell lenta.
Segue o que deve ser inserido em um dos arquivos acima:
if [ -z "$HOMEBREW_PREFIX" ]; then export PATH="/opt/homebrew/bin:$PATH" if command -v brew 1>/dev/null 2>&1; then SHELL_ENV="$(brew shellenv)" echo -n "$SHELL_ENV $(cat ~/.zshrc)" > .zshrc eval $SHELL_ENV fi fi export PATH="$HOMEBREW_PREFIX/opt/[email protected]/bin:$PATH" export LDFLAGS="-L/opt/homebrew/lib -L/opt/homebrew/opt/[email protected]/lib -L/opt/homebrew/opt/sqlite/lib -L/opt/homebrew/opt/[email protected]/lib -L/opt/homebrew/opt/libffi/lib -L/opt/homebrew/opt/openblas/lib -L/opt/homebrew/opt/lapack/lib -L/opt/homebrew/opt/zlib/lib -L/opt/homebrew/Cellar/bzip2/1.0.8/lib -L/opt/homebrew/opt/readline/lib" export CPPFLAGS="-I/opt/homebrew/include -I/opt/homebrew/opt/[email protected]/include -I/opt/homebrew/opt/sqlite/include -I/opt/homebrew/opt/libffi/include -I/opt/homebrew/opt/openblas/include -I/opt/homebrew/opt/lapack/include -I/opt/homebrew/opt/zlib/include -I/opt/homebrew/Cellar/bzip2/1.0.8/include -I/opt/homebrew/opt/readline/include" export PKG_CONFIG_PATH="$HOMEBREW_PREFIX/opt/[email protected]/lib/pkgconfig" export PKG_CONFIG_PATH="$PKG_CONFIG_PATH:$HOMEBREW_PREFIX/opt/[email protected]/lib/pkgconfig:$HOMEBREW_PREFIX/opt/libffi/lib/pkgconfig:$HOMEBREW_PREFIX/opt/openblas/lib/pkgconfig:$HOMEBREW_PREFIX/opt/lapack/lib/pkgconfig:$HOMEBREW_PREFIX/opt/zlib/lib/pkgconfig" export GDAL_LIBRARY_PATH="/opt/homebrew/opt/gdal/lib/libgdal.dylib" export GEOS_LIBRARY_PATH=$GDAL_LIBRARY_PATH export LD_LIBRARY_PATH=$HOMEBREW_PREFIX/lib:$LD_LIBRARY_PATH export DYLD_LIBRARY_PATH=$HOMEBREW_PREFIX/lib:$DYLD_LIBRARY_PATH export OPENBLAS="$(brew --prefix openblas)" if command -v pyenv 1>/dev/null 2>&1; then eval "$(pyenv init -)" fi
Instalando Python 3 no M1
Para instalar o Python através do pipenv no m1 é necessário aplicar um patch para corrigir algumas informações da arquitetura.
O time do Homebrew disponibilizou esses patchs e pode ser localizado em: https://github.com/Homebrew/formula-patches/tree/master/python
Como estou instalando a versão 3.8, segue o comando:
PYTHON_CONFIGURE_OPTS="--with-openssl=$(brew --prefix openssl)" \ pyenv install --patch 3.8.7 <<(curl -sSL "https://raw.githubusercontent.com/Homebrew/formula-patches/master/python/3.8.7.patch")
NVM e Node no M1
mkdir ~/.nvm
Colocar no .zshrc ou .bashrc
export NVM_DIR="$HOME/.nvm" [ -s "/opt/homebrew/opt/nvm/nvm.sh" ] && . "/opt/homebrew/opt/nvm/nvm.sh" # This loads nvm [ -s "/opt/homebrew/opt/nvm/etc/bash_completion.d/nvm" ] && . "/opt/homebrew/opt/nvm/etc/bash_completion.d/nvm" # This loads nvm bash_completion
Fim da primeira parte:
Essa primeira parte mostrei como instalar o gerenciador de pacores, Python e Node. Irei fazer Posts sobre partes especificas como Android Studio, Xcode, Docker e etc.
Espero que me acompanhem e qualquer dúvida pode deixar o comentário.
Até mais
1 note
·
View note
Text
[ad_1] Superbass a complete back end for web and mobile applications based entirely on free open source software the biggest challenge when building an app is not writing code but rather architecting a complete system that works at scale products like Firebase and amplify have addressed this barrier but there's one Big problem they lock you into proprietary technology on a specific Cloud platform Superbass was created in 2019 specifically as an open source Firebase alternative at a high level it provides two things on the back end we have infrastructure like a database file storage and Edge functions that run in The cloud on the front end we have client-side sdks that can easily connect this infrastructure to your favorite front-end JavaScript framework react native flutter and many other platforms as a developer you can manage your postgres database with an easy to understand UI which automatically generates rest and graphql apis to use In your code the database integrates directly with user authentication making it almost trivial to implement row level security and like fire base it can listen to data changes in real time while scaling to virtually any workload to get started you can self-host with Docker or sign up for a fully managed Account that starts with a free tier on the dashboard you can create tables in your postgres database with a click of a button insert columns to build out your schema then add new rows to populate it with data by default every project has an authentication schema to manage users Within the application this opens the door to row level security where you write policies to control who has access to your data in addition the database supports triggers to react to changes in your data and postgres functions to run stored procedures directly on the database server it's a nice interface But it also automatically generates custom API documentation for you from here we can copy queries tailored to our database and use them in a JavaScript project install the Super Bass SDK with npm then connect to your project and sign a user in with a single line of Code and now we can listen to any changes to the authentication state in real time with on off stage change when it comes to the database we don't need to write raw SQL code instead we can paste in that JavaScript code from the API docs or use the rest and graphql Apis directly and that's all it takes to build an authenticated full stack application however you may still want to run your own custom server-side code in which case serverless Edge functions can be developed with Dino and typescript then easily distributed around the globe this has been super Bass in 100 seconds if you want to build something awesome on this platform we just released a brand new Super Bass course on fireship i o it's free to get started so check it out to learn more thanks for watching and I will see you in the next one [ad_2] #Supabase #Seconds For More Interesting Article Visit : https://mycyberbase.com/
0 notes
Text
Postgres Database Installation Setup Guide for Beginners | Postgres Database Configuration Explained
Hello friends, a new #video on #postgres #database #installation #setup with #configuration is published on #codeonedigest #youtube channel. Step by step #tutorial #guide to install postgres database. Enjoy #programming #coding with #codeonedigest
PostgreSQL or Postgres is the most commonly used open-source relational database. It offers features like robustness, reliability, cost-free, etc. PostgreSQL serves as a data warehouse for multiple applications like web apps, mobile apps, etc. It enables us to store enormous and sophisticated data securely. Memento Design pattern defines three roles for objects. PostgreSQL is a powerful,…
View On WordPress
0 notes
Text
Xcode for mac os x 10.7.5

#XCODE FOR MAC OS X 10.7.5 HOW TO#
#XCODE FOR MAC OS X 10.7.5 FOR MAC OS X#
#XCODE FOR MAC OS X 10.7.5 INSTALL#
#XCODE FOR MAC OS X 10.7.5 64 BIT#
#XCODE FOR MAC OS X 10.7.5 CODE#
#XCODE FOR MAC OS X 10.7.5 INSTALL#
Homebrew will install a couple of packages required by Python and then Python itself. Now that you’ve got Homebrew installing Python is simple: brew install python See or type brew help or man brew for more info on Homebrew. Normal executables go in /usr/local/bin/ and Python scripts installed by Homebrew go in /usr/local/share/python/. bash_profile) file: export PATH=/usr/local/bin:/usr/local/share/python:$PATH To add Homebrew installed executables and Python scripts to your path you’ll want to add the following line to your. Homebrew installs things to /usr/local/ so you don’t need sudo permissions. To install it simply launch a terminal and enter ruby -e "$(curl -fsSkL /mxcl/homebrew/go)"
#XCODE FOR MAC OS X 10.7.5 FOR MAC OS X#
Homebrew is an excellent package manager for Mac OS X that can install a large number of packages. (You’ll need a free Apple ID.) (See also. If you prefer another editor it’s possible to get only the libraries and compilers that you need with the Command Line Tools for Xcode. However, I use hardly any of its features and unless you’re an iOS or Mac developer you probably won’t either.
#XCODE FOR MAC OS X 10.7.5 CODE#
I use the Xcode editor because I like its syntax highlighting, code completion, and organizer. On Lion you can install Xcode from the App Store, on Snow Leopard you’ll have to get an older Xcode from. You will need Apple’s developer tools in order to compile Python and the other installs. Update: If doing all the stuff below doesn’t seem like your cup of tea, it’s also possible to install Python, NumPy, SciPy, and matplotlib using double-click binary installers (resulting in a much less flexible installation), see this post to learn how. On Snow Leopard you won’t install Xcode via the App Store, you’ll have to download it from Apple.Īfter I’d helped my friend I found this blog post describing a procedure pretty much the same as below. These instructions are for Lion but should work on Snow Leopard or Mountain Lion without much trouble. See the “Install Python” page for the most recent instructions.Ī bit ago a friend and I both had fresh Mac OS X Lion installs so I helped him set up his computers with a scientific Python setup and did mine at the same time. Update: These instructions are over a year old, though they may still work for you.
Setting the State of a Postgres Sequence.
You can work around the bug in Xcode 3.2.x by using the -k-no_order_inits command line parameter when compiling a dynamic library. There is however an issue when compiling dynamic libraries with FPC under Mac OS X 10.6 due to a bug in the Xcode 3.2.x linker. Xcode 3.2.x - 4.2 compatibility (Mac OS X 10.6)įPC 3.0.4 is qualified for use with Mac OS X 10.4 till macOS 10.14. Afterwards, FPC will install and function correctly. To install them manually, open Xcode, go to Preferences, select "Downloads" and install the "Command Line Tools". Xcode 4.3 and later however no longer install the command line tools by default, which are required by FPC. Xcode 4.3 - 5.x compatibility (Mac OS X 10.7/OS X 10.8)įPC 3.0.4 is qualified for use with Mac OS X 10.4 till macOS 10.14. To install them manually, open "/Applications/Utilities/Terminal", execute "xcode-select -install" and choose "Install". Xcode 5 and later however no longer install the command line tools by default, which are required by FPC. Xcode 5+ compatibility (OS X 10.9 for OS X 10.8, see below)įPC 3.0.4 is qualified for use with Mac OS X 10.4 till macOS 10.14.
#XCODE FOR MAC OS X 10.7.5 HOW TO#
See also the section below on how to install the command line tools. If you already installed FPC under a previous Mac OS X/OS X/macOS version, you will have to reinstall FPC 3.0.4a under macOS 10.14 to get a configuration file that enables the compiler to find the necessary files). Xcode 10 installs some command line file in different locations compared to previous releases. These workarounds are required because we do not pay Apple 79 euro per year, which would prove you can trust us.įPC 3.0.4 is qualified for use with Mac OS X 10.4 till macOS 10.14. If this does not work, you may first have to go to System Preferences -> Security & Privacy -> General, and "Allow apps downloaded from: Mac App Store and Identified developers". If you get the message that the FPC installer was created by an unknown developer and cannot be opened, right-click on the installation package and choose "Open" in the contextual menu. "Unknown developer" error when installing (Mac OS X 10.7 and later)
#XCODE FOR MAC OS X 10.7.5 64 BIT#
Fpc-3.0.4a.intel-macosx.dmg : FPC for 32 and 64 bit Intelįpc-3.0.4.powerpc-macosx.dmg : FPC for 32 and 64 bit PowerPCįpc-3.0.5. : FPC cross-compilers from Intel to 32 and 64 bit iOSįpc-3.0.4. : FPC cross-compilers from Intel to 32 and 64 bit PowerPCįpc-3.0.4. : FPC cross-compiler from Intel to JVM (very limited Pascal RTL support, but full JDK 1.5 support)
0 notes
Text
Postgres app or postgres

#POSTGRES APP OR POSTGRES INSTALL#
Payment will be charged to your iTunes Account at confirmation of purchase. Any unused portion of a free trial period, if offered, will be forfeited when the user purchases a subscription to that publication, where applicable. Your Account will be charged for renewal (based on your selected plan) within 24-hours prior to the end of the current period. Subscriptions auto-renew within 24 hours of the expiration date unless auto-renewal is turned off in the iTunes account settings. Premium is available as either a Lifetime Purchase or through a Subscription with Monthly and Yearly options. SQLPro requires a Premium upgrade in order to interact with database result sets. It is a client tool for working with existing local or remote PostgreSQL servers. PgAdmin is graphical user interface administration tool for PostgreSQL.
#POSTGRES APP OR POSTGRES INSTALL#
It sets up a PostgreSQL database server on your computer when you install it. It will not work with other database servers such as MSSQL, MySQL or Oracle. Postgres.app is a full-featured PostgreSQL installation packaged as a standard Mac app. SQLPro for Postgres works with PostgreSQL database servers. + SSH Tunnelling (password authentication only). + Dark & Light themes which can be switched manually or automatically adjusted by your devices brightness. + Quick access to tables, columns and more. + Support for executing multiple queries at once. + Tabbed based interface for an optimal user experience (iPad). SQLPro for Postgres is a lightweight but powerful PostgreSQL database client, which allows quick and simple access to Postgres Servers including cloud services such as Amazon RDS, Microsoft Azure, Heroku Digital Ocean.
0 notes
Text
If this is not one of the most robust, free, rich and informative era ever then I cannot think of any other time in history adorned with the wealth of technology as this one. If you would wish to accomplish anything, this era wields the most virile grounds to nourish, nurture and aid the sprouting, the growth and the maturity of your dreams. You can literaly learn to be what you would wish to be in this age. That being said, this disquisition takes on a quest to get you into setting up something similar to Heroku on your own environment. We shall get to know what Heroku is then get off the dock and sail off towards our goal of having such an environment. The proliferation of cloud technologies brought with it many opportunities in terms of service offerings. First and foremost, users had the ability to get as much infrastructure as they could afford. Users can spawn servers, storage and network resources ad libitum which is popularly known as Infrastructure as a service. Then comes the second layer that sits on the infrastructure. It could be anything, cloud identity service, cloud monitoring server et cetera. This layer provides ready made solutions to people who might need them. This is known as software as a service. I hope we are flowing together this far. In addition to that there is another incredible layer that is the focus of this guide. It is a layer that targets developers majorly by making their lives easier on the cloud. In this layer , developers only concentrate on writing code and when they are ready to deploy, they only need to commit their ready project in a source control platform like GitHub/GitLab and the rest is done for them automatically. This layer provides a serverless layer to the developers since they do not have to touch the messy server side stuff. This layer as you might already have guessed is known as Platform as a Service (PaaS). Heroku is one of the solutions that sits on this layer. In this guide, are going to setup a platform that is similar to Heroku on your own infrastructure. As you know, you cannot download and install Heroku on your server. It is an online cloud service that you subscribe to. We will use Caprover to setup our own private Platform as a service (PaaS). CapRover is an extremely easy to use app/database deployment & web server manager for your NodeJS, Python, PHP, ASP.NET, Ruby, MySQL, MongoDB, Postgres, WordPress and even more applications. Features of Caprover CLI for automation and scripting Web GUI for ease of access and convenience No lock-in! Remove CapRover and your apps keep working! Docker Swarm under the hood for containerization and clustering Nginx (fully customizable template) under the hood for load-balancing Let’s Encrypt under the hood for free SSL (HTTPS) One-Click Apps: Deploying one-click apps is a matter of seconds! MongoDB, Parse, MySQL, WordPress, Postgres and many more. Fully Customizable: Optionally fully customizable nginx config allowing you to enable HTTP2, specific caching logic, custom SSL certs and etc Cluster Ready: Attach more nodes and create a cluster in seconds! CapRover automatically configures nginx to load balance. Increase Productivity: Focus on your apps! Not the bells and whistles just to run your apps! Easy Deploy: Many ways to deploy. You can upload your source from dashboard, use command line caprover deploy, use webhooks and build upon git push Caprover Pre-requisites Caprover runs as a container in your server which can be any that supports containerization. Depending on your preferences, you can use Podman or Docker to pull and run Caprover image. For this example, we are going to use Docker. In case you do not have Docker installed, the following guides listed below will be there to help you set it up as fast as possible. Install Docker and Docker Compose on Debian Setup Docker CE & Docker Compose on CentOS 8 | RHEL 8 How To Install Docker on RHEL 7 / CentOS 7
How To Install Docker CE on Ubuntu Once Docker Engine has been installed, add your user account to docker group: sudo usermod -aG docker $USER newgrp docker Another pre-requisite is a wildcard domain name pointed to the IP of your server where Caprover Server will be running. Setup your Heroku PaaS using CapRover Once the pre-requisites are out of the way, the only task remaining now is to set up our Caprover and poke around its rooms just to see what it has to offer. The following steps will be invaluable as you try to get it up and running. Step 1: Prepare your server Once Docker is installed, you can install all of the applications you need during your stay in the server. They include an editor and such kind of stuff. ##On CentOS sudo yum update sudo yum install vim git curl ##On Ubuntu sudo apt update sudo apt install vim git curl That was straingtforward. Next, let us pull Caprover image to set the stone rolling Step 2: Pull and execute Caprover Image We are going to cover the installation of Caprover depending on where your server sits. Scenario 1: Installation on a local server without Public IP Install dnsmasq After all, as mentioned in the pre-requisites section, we shall need a small DNS server to resolve domain names since Caprover is so particular with it. In case you have a local DNS server that supports wildcard domains, then you are good to go. You can skip the DNS setup part. In case you do not have it, install lightweight dnsmasq as follows: sudo yum -y install dnsmasq After dnsmasq is successfully installed, start and enable the service. sudo systemctl start dnsmasq sudo systemctl enable dnsmasq Add Wildcard DNS Recod Once dnsmasq is running as expected, we can go ahead and add the configs and wildcard domain name as shown below: $ sudo vim /etc/dnsmasq.conf listen-address=::1,127.0.0.1,172.20.192.38 domain=example.com server=8.8.8.8 address=/caprover.example.com/172.20.192.38 Replace the IPs therein with yours accordingly. Then restart dnsmasq sudo systemctl restart dnsmasq Test if it works We shall use the dig utility to test if our configuration works $ dig @127.0.0.1 test.caprover.example.com ; DiG 9.11.20-RedHat-9.11.20-5.el8 @127.0.0.1 test.caprover.example.com ; (1 server found) ;; global options: +cmd ;; Got answer: ;; ->>HEADER> Checking System Compatibility > Checking System Compatibility
0 notes
Text
Download skype for mac 10.6 8

Download skype for mac 10.6 8 for mac#
Download skype for mac 10.6 8 mac os#
Download skype for mac 10.6 8 update#
Download skype for mac 10.6 8 free#
Open the ist file in Property List Editor. To use "Property List Editor" from Xcode. Getting the newest version of something is not security, it is security theater! and one more step it will be you can only use it on X platforms. Which means I don't really have a reason to have Skype anymore and I might as well delete my 3 accounts ( oh one of them's a Microsoft account, I can't darn ). Get the latest version of Skype at website…" calling in came up with your party cannot be reached. Text chat works, although it took a while to propagate that I was online.Īudio or video calling out on the other hand sent a message that said " 'your contact' might not receive your call on all their devices as 'contact' is calling using an out of date version of Skype. Then I proceed to go and test it by logging in on my iphone4s with my other account, where it tells me this nice thing about "Color your world. luckily I save copies of all app installs, even a handful of versions.
Download skype for mac 10.6 8 free#
All of the older versions of Skype have no viruses and are totally free on Uptodown.
Download skype for mac 10.6 8 update#
I needed to open Skype today, after not being able to login stupid me hit update and of course it pulls down the newest version which is incompatible. Download older versions of Skype for Mac. Then go to Applications, Open Skype and Log In. Install Skype by double clicking on the downloaded file and dragging the Skype icon to the applications folder and Repeat Step 1. Move all of the results returned to the trash.ĭownload from a safe website Skype Version 6.15 for Mac.
Download skype for mac 10.6 8 mac os#
Open Finder and search for “Skype” using the search feature in Mac OS X. PostgreSQL also known as Postgres, is a free and open-source relational database management system (RDBMS) emphasizing extensibility and SQL compliance.Open ~/Library/Preferences and drag to the trash.Important: If you’d like to keep your chat and call history, skip the following step. To find your home folder, open Finder and, from the menu bar, select Go > Home. Then open ~/Library/Application Support * and drag the Skype folder to the trash.Open your Applications folder and drag your copy of Skype to the trash.To completely uninstall, and then reinstall Skype for Mac: If that doesn't work, then Remove all of the current skype files from your computer. Then go to File and click on Save, or press Command+S What are the system requirements for Skype If you have further questions, please do not hesitate to reply to this post. You may visit the link below as a reference. We strongly suggest you use Skype on a supported device. Scroll Down until you locate Locate these 3 lines:Ħ. For Mac, the version needed for Skype to work is 10.9 or higher.Go to Applications Folder in Finder and Right Click on the Skype icon.
Download skype for mac 10.6 8 for mac#
Viber for Mac is a solid IM and VoIP client that's worth trying for anyone that's had enough of Skype and Messages. However, some users have already reported problems with syncing and the lack of ability to call mobiles is a bit disappointing. The tool uses a peer-to-peer technology based. A free tool that lets you talk to other users using text chats, voice and/or video conversations. Skype is the world's leading VoIP calling service. Viber for Mac generally syncs very reliably and efficiently and the quality of video-to-video on Mac is as good as anything Skype can offer. Make VoIP calls to any phone in the world. You'll need to sign-up for a Viber account if you don't have one, which you are prompted to do when you setup the app. Anyone who has used Skype or Messages will have no problems using Viber. The interface is very elegant and easy to use. You can make calls and video chats with other Macs but you can't yet make video calls to mobile devices or do video conferencing using Viber for Mac. Contacts are also synced, although some users already report some problems with this. Viber does a good job of making sure that wherever you left off on your mobile device, your chats can be picked up. The developer of Viber for Mac is keen to highlight that it has superior mobile syncing than competitor products.
0 notes
Text
Psequel gui windows

PSEQUEL GUI WINDOWS FOR MAC OS
PSEQUEL GUI WINDOWS INSTALL
PSEQUEL GUI WINDOWS UPDATE
PSEQUEL GUI WINDOWS UPDATE
So just type your password and press ENTER/RETURN key. My Stable Diffusion GUI update 1.3.0 is out now Includes optimizedSD code, upscaling and face restoration, seamless mode, and a ton of fixes. In the good old MySQL world, my favorite client is Sequel Pro, but its support for PostgreSQL doesn't seem to. However, they are either web-based, Java-based or don't support the features I want. I know there is a list of PostgreSQL GUI Tools. However, I found its UI is clumsy and complicated. Free Administration Centre for the PostgreSQL database. It's also one of the few clients to provide a GUI front end to the plpgsql debugger. It provides a SQL query tool, an editor for procedural languages and a CRUD interface. When you type the password, it won't be displayed on screen, but the system would accept it. Well, pgAdmin is great for its feature-richness. For many years the 'standard' freely available GUI client for Postgresql, and so is bundled in many packaged installers. If the screen prompts you to enter a password, please enter your Mac's user password to continue. No, PSequel is written from scratch in Swift 2, although PSequel's UI is highly inspired by Sequel Pro. This meant that everyone had to start pulling up Rethink docs, and learning the query syntax to update/delete/etc records, slowing down the efforts of front-end developers that otherwise don't need to know the query language.
PSEQUEL GUI WINDOWS INSTALL
Ruby -e '$(curl -fsSL )' /dev/null brew install caskroom/cask/brew-cask 2> /dev/null PSequel is a Swift based standalone OS X client application that provides a simple and straightforward PostgreSQL GUI designed to help you perform a number of basic operations using a. RethinkDB didn't have an admin GUI, like Robomongo and Psequel, that we had been accustomed to using on other projects. Press Command+Space and type Terminal and press enter/return key.App description: sequel-pro (App: Sequel Pro.app).The most popular Linux alternative is DBeaver, which is both free and Open Source.If that doesn't suit you, our users have ranked 32 alternatives to PSequel and 15 are available for Linux so hopefully you can find a suitable replacement. can we have a link to download the full server ISO not the core. i think the link MS provided is server core. it doesn't even have the GUI install interface when you install it 'Server Graphical Shell'. it's not the first time i Install Windows. OS on the hardware of other manufacturers - unlike Windows which is developed by Microsoft. there is no such options, only standard or data center.
PSEQUEL GUI WINDOWS FOR MAC OS
PSequel is not available for Linux but there are plenty of alternatives that runs on Linux with similar functionality. Just found this: PSequel, a PostgreSQL GUI Tool for Mac OS X. PSequel provides a clean and simple interface to perform common PostgreSQL tasks quickly. For all the Postgres fans, here is a nice looking tool for Mac OS X: Designed for Yosemite. PSequel – PostgreSQL GUI tool for Mac OS X. Modern, native client with intuitive GUI tools to create, access, query & edit multiple databases: MySQL, PostgreSQL, SQLite, Microsoft SQL Server.
0 notes